


1066
-
Posts
742 -
Joined
-
Last visited
Content Type
Profiles
Forums
Calendar
PW Shop
Posts posted by 1066
-
-
Are you saying Jamie, that a round has chambered normally, without undue bolt tension/stiffness, then fired and when extracting the round the bolt is stiff to operate? or are you saying that when you have rechambered a fired case the bolt is stiff to operate?
If the round chambered normally and fired then the bolt was stiff to operate when trying to exctract, then that most probably indicates to me that high pressure is involved.
If the fired case doesn't chamber easily then that will be sorted when you resize - full length resizing will get you back to factory spec. Again a photo of the cartridge head before decapping may tell us more. any sign of ejector marks showing on the head?
-
It shouldn't be when unloading a fired round as the case should swell to fit the chamber and it can't swell any more then as it cools rapidly you get a slight contraction. If it is on loading then were the rounds fired in the same rifle? after that are your dies set correctly or are you effectively slightly squashing the cases which can cause them to be tight.
In my experience, a sticky or abnormal bolt lift is a sure sign of over pressure.
-
Cheers 1066.
I'll get some pics sorted. The targets are abit muddy and have my scribble on them but should give an idea.
If the results are consistant then i'll leave it at that for now as haven't done much vermin control as the reloading took over for a while.
Although, when i've been out and cleared some more vermin i do intend on abit of fine tuning with the best group by 0.1, 0.2 of a grain and so on.
I forgot to mention last night that i had a few rounds, (maybe 5 out of 50 odd) that were slightly stiff to cycle. The trouble is i don't recall if it was when loading them into the breech or unloading them?? I know it has to do with expansion but not certain why it's happened to so few?? Any idea why?
If it's when loading then it's usually a sizing problem, this is why I would advise to full length resize every time. There is a theoretical accuracy improvement in only neck sizing and minimal working of the brass is desirable but many top paper punchers full length every time, in fact I read only yesterday that the new F/TR European Champion, Tim Stewart, F/L sizes every time.
It's much better to have a rifle/ammo that is reliable. Rather like having a Skoda or a Farrari. If the Farrari won't start when you want it to then you're better off with the skoda.
If it's when unloading then this requires thinking about before you load up some more. This could well be a sign of over pressure. Post some pics of your cartridge head so we can see if there are signs of over pressure there.
-
not true
I have a full bore moderator listed on my FAC
I use it on 6 calibres.
the mod has a slot of its own, what you stick it one once you own it is up to you
I agree - My variation came back this morning. One mod, two rifles same calibre.
-
Good result Jamie - The 8208 powder in the 28 grn range looks like you're getting somewhere and I would stick with the same bullet for now. You'll hear a lot about sub 1/2 inch groups but you won't actually see many, especially 5 shot groups shot consecutively so well done. I would load up another few of the 28-28.5gn load exactly the same and see if the results repeat. If they do and if the velocity gives you enough for what you want to do then you could call it a day and say thats good enough. One school of thought seems to run - it's good enough for hunting why bother with looking for more accuracy.
If you can repeat the sub .5 groups then thats the place to start tweeking and fine tuning the load - every 10th below .5 is hard work but the .2 and .3's will soon start to show up.and that will make you smile.
How about posting some photos of the groups - the pictures might also tell a story.
-
It's not far away from Red dot and there's plenty of loads for that - I used to use Red dot/Blue dot in handgun loads as it was half the price of Bullseye.
-
As I understand it Jamie, you have factory loads shooting into .6inch and your handloads going into two inches. Worrying about distance to the lands really comes into play when you are trying to improve on factory groups. Likewise just necksizing may improve accuracy but the factory rounds are all full length resized (SAMMI Spec) and they work passably well in your rifle, so why not start there.
I would go back to basics:
Full length resize, trim to length using the lee trimmer, use the bullet you know works in the factory round, check the manual for a reasonable load about 2/3rds up the range and go and shoot it.
If those loads are more than an inch and you're happy you and the conditions were a fair test, then I would suggest there may be a fundmental problem (press out of alignment, excessive crimp etc.) Tuning seating depth and playing with neck tension are tools in the box but really only when you're trying to improve on a bog standard factory round.
What about showing a photo of your loaded rounds and what the primer looks like after you have shot them.
-
0.6" is over half an inch BTW
 A little encouragement might go a long way - we all had to start somewhere and Jamie is starting from scratch and working it out, bit at a time. Getting his groups from 2" to 1" should be his next target and reasonably easily acheivable if he starts to pay attention to the details. Assuming his .6 group is repeatable and not just a "one off" then we know he and the rifle can shoot to that standard.
I would start with using the same bullet that performs, in his rifle, to a known standard ie 32gn accutip. That cuts out one variable. Seat it to the same depth as the factory round and cut out another variable. Full lenght size back to Sammi spec, another variable out of the way. Very carefully weigh the powder, try a couple of different primers/ powders and make a note of every step.
Measure the groups carefully - find out what works and what doesn't but I would try and duplicate a factory round that works fairly well first.
-
I really don't think a few thou of runout is too much of a problem for you Jamie. Are you using a good Single stage press or a Turret? If you were shooting 3" x 5 shot groups at 300yds and you were trying to get them down to half that then these are the type of thing that you would be really paying attention to.
If you want to see how much difference it makes, load a batch of say 20 rounds exactly the same and to the best of your ability, do your "roll" test and select the 5 worst rounds. Then select the 5 best rounds - Then go and shoot the rounds under ideal conditions with a solid bench and good sandbags. Measure the groups carefully, you should find out if the results are exceptable for what you want to do at the ranges you do it.
Of course, you might just enjoy the satisfaction of shooting tiny groups with ammunition you have made yourself.

-
This is the most comprehensive test of .22 ammunition that I've seen - This is shot with a top of the range rifle/shooter in ideal conditions. The most accurate subsonic ammo at 100 yds was the Eley at .92 inch so, in theory a 2 inch group could be acheived. I've shot bench rest .22 at 200yds with a pukka target rifle and match ammunition and I would be over the moon with a 5 shot 2 inch group.
http://www.accurateshooter.com/guns-of-week/22lr-rimfire-ammo-comparison-test/
-
He's got a laser mounted further down...
Yep, thats exactly right.
The way I set this up is to first zero the rifle with a standard scope, I use a 50yd zero for this with the .22rf. Then fit the laser and juggle around with it until it is pointing to exactly the same place as the scope crosshairs and tighten it up. Now, in effect you could shoot it from the hip, where the laser points is where the bullet goes, within half an inch from 25-60yds. Now take the standard scope off and fit the night scope. Juggle around with the nightscope mountings until the laser is somwhere in the middle of the picture, a bit of shimming/filing as required, then lock it up.
Now all you need to do, when you have your rabbit squarely in the picture is a quick press of the flying lead - Rabbit stew.
When you get used to it and for close range shots out to maybe 30-40 yds you don't even need the laser, just visualise where it would be.
Now I know it can't compare with a dedicated night vision rig but it works well and only cost about £120.
I made the mounts by chopping up a set of cheap scope mounts and bolting them to an aluminium bar about 15mmx10mm then bolting the bar to the scope. This scope has two mounting points so makes this easy, the thread is a standard camera thread (1/4 whit)
-
Here's one I made earlier
And here's some video I shot using the AV take-off into my old Sony Handicam.

-
Nice video-- can you tell us what the deal with your improved pan-hanger is?
I'm interested in the OP's problem because I have one quite similar with my 505 when used with your trickler. I will set it to throw a charge, and 9 times out of 10 it will be spot on, and the other time significantly over. I've watched it do this, and the symptom is that when the quantity is approached, the beam hesitates to lift from the bottom, then moves up sharply and overshoots. It's behaving as though there is some friction there, but in my case, not always. I looked at all the obvious things but was never able to see anything wrong.
Ahh!. Stuck at the bottom syndrome. This happens on a few scales where the beam is a little "top heavy". The way to fix this is to stop the damper blade bottoming right out in the damper slot. I place a small strip of felt or even polystyrene in the bottom of the slot, only about 1-2mm thick to act as a buffer. This also stops the damper blade crashing down every time you remove the pan - It sounds better, feels better and works better.
Here's my idea about the pan hanger.
http://img.photobuck...tirup070510.jpg
Dull knife edge. Easily fixed.
http://img.photobuck.../Knifeedge2.jpg
Chipped knife edge. Not easily fixed.
-
If you're sure the damper isn't actually touching the bodywork then it shouldn't be a problem, just check that there are no hairs of wirewool in the slot that the magnets have picked up. The bearings need to be clean and should be free to wobble about, if your not happy with them, take them out and give them a clean is some sort of spirit and a toothbrush, also clean the bearing housings.
Have a look at the knife edges through a glass, they should be sharp with no dull areas or burrs, also the ends should come to a sharp point, inline with the knife edge. If they are dull then a very careful dressing with some 1200 grade wet &dry will do the trick. I use it stuck to a flat strip of metal with double sided tape to make a small "file".
Have a look at the little wire loop where the pan hangs, it should be free to swing, right in the middle of the tiny knife edges there.
Here's a video I made about tuning up the RCBS scales:
-
Not heard of neck tension before. I'm new to reloading so best i start reading up!
Here's some background reading to get you started. I agree with Kent - A machine is the way to go if you are serious about it.
-
Well it depends a bit on what sort of reloading you do and what you hope to get out of it. If you are looking for extreme accuracy, for example F class targets at 1000yds, then annealing after every three or four loading maybe worthwhile to help keep neck tension uniform. If you shoot some odd wildcat calibre where brass is hard to come by or needs careful forming then extending the usable life of cases could well make it necessary.
Even regular shooting/reloading, with good quality brass now around a pound a case, it makes sense to get the best out of it. Five or six reloads might start showing a couple of cracked necks then it's time to dump the brass, annealed cased might go to twice that before primer pockets start to loosen up.
I anneal after about four reloads. When sizing and seating the bullets it feels like new brass every time.
-
Thanks all,
as you will see the boxes are filling up but there are stil some to chase!
Please help if you can.
Thanks
David
I've been in touch with Anthony Armstrong the UKIP candidate for Sussex. He has now changed his "x" for a tick.
Quote:
Just for clarification I will repeat that I do not see any problems with legally held firearms. It is unfortunate that most criminals do not apply for licenses! I will also be pleased to meet with BASC after I am elected.
-
Yep - Volley sight like this
http://world.guns.ru/rifle/repeating-rifle/brit/smle-lee-enfield-e.html
-
Well done mate, a good clear video. I'm sure many owners don't strip and clean their bolts from one year to the next.
-
I think you might have the wrong end of the stick there mate - "Blowback system" is the standard type of action for semi-auto .22 rimfire and some low powered centrefire pistol cartridges such as something like a .32 S&W, as opposed to something like a 9mm or .45ACP that uses some sort of locked breech system.
I've never come across gas operated semi-auto .22 rimfire action and there is no practical way of slowing down the bolt recycling time without changing the recoil/firing pin springs.
There are a few odd types like the Voere .22 semi-auto that you can lock the breech and basically use as a bolt action or as a semi-auto but not many.
-
Henry Krank might be your first port of call.
-
Well you seem to have sussed that out about right Jamie - There are plenty more important things in the reloading line to spend your money on than a fancy tumbler when you get started. Scotch bright will do nicely to get you going and spend you next hundred pounds on measuring equipment like a reasonable beam scale, digital calipers, micrometer etc. I'm not saying there isn't a place for a tumbler, I have a rotary tumbler with stainless steel media which is the bees knees and it's nice to have blingy brass with little effort but using scotch bright you get to inspect each case as you do it.
I'm not keen on using wire wool no matter how fine it is. Little strands float about your bench and you will find that the damping magnets on your scales pick up every bit.
With the dinky 204 type cases you might think about a cheap ultrasonic cleaner from Maplins along with the seagreen cleaner agent
-
Blimey - 8%. I would be concerned about your off centre firing pin strike. If the strike isn't directly over the anvil in the primer it may well cause problems.
-
Is there any difference between the 502 and 505 or would I be ok with either?
The only difference between the 502 and the 505 is the slight difference in how you set the single and tenth grains. Both use exactly the same knife edge/floating agate bearing set-up so they are both equally as accurate (and will last a lifetime) All RCBS scales are made by Ohaus. (Not sure about the nasty R130)
The Lee scale is accurate but not very user friendly - It is under damped and very fidly to set the desired weight.
As has already been said, you will need to weigh every charge because of the nature of what you are planning to do. If you were using a load in the 3-4 grain range for something like a target load for a .38 revolver you may well just dump the charge through a measure and a couple of tenths either way wouldn't be a worry. Dumping a charge a couple of tenths light with your squib loads might land you in dangerous territory.
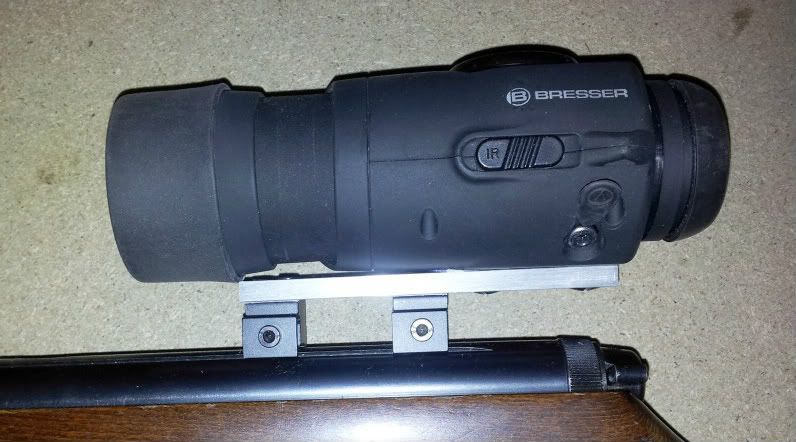
Bresser N.V
in Guns & Equipment
Posted
Ahh yes! The Bresser is stil working well - I've been using mine for over a year now with no problems, Here's the rifle it's mounted on.