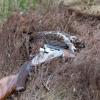
Smokersmith Posted May 8, 2020 Report Share Posted May 8, 2020 Good morning all. So ... I’ve sanded away 30 years of overspray paint and can now see some wood. The grip area has some cosmetic cracking to it .... any thoughts on how to deal with it? I was thinking of just using a touch of wood filler or Araldite ... not looking for an outstanding finish. https://www.dropbox.com/s/61vqry4ah08uuze/Photo 08-05-2020%2C 08 50 09.jpg?dl=0 Quote Link to comment Share on other sites More sharing options...
matone Posted May 8, 2020 Report Share Posted May 8, 2020 Run liquid superglue into them perhaps? I`ve repaired some pretty bad breaks with it and it`s not let go. Hth. Quote Link to comment Share on other sites More sharing options...
johnphilip Posted May 8, 2020 Report Share Posted May 8, 2020 You could sand them a bit more to see how deep they are , or as matone say superglue . Do you still have any of the saw dust , laid about . If so collect it up . Apply the glue , then add some sawdust on the glue while it's still wet gently try and rub it into the glue . Let it go if and resand . Keep doing it till you get the finish you want . We use that process when wood turning . Quote Link to comment Share on other sites More sharing options...
Smokersmith Posted May 8, 2020 Author Report Share Posted May 8, 2020 Sounds like a plan … I've some of the CA thin glue that penetrates well … should do what I'm looking for. Quote Link to comment Share on other sites More sharing options...
johnphilip Posted May 8, 2020 Report Share Posted May 8, 2020 3 minutes ago, Smokersmith said: Sounds like a plan … I've some of the CA thin glue that penetrates well … should do what I'm looking for. Keep us posted , how you get on . Quote Link to comment Share on other sites More sharing options...
oldypigeonpopper Posted May 8, 2020 Report Share Posted May 8, 2020 hello, depends what top coat your going to finish with ? Quote Link to comment Share on other sites More sharing options...
Smokersmith Posted May 8, 2020 Author Report Share Posted May 8, 2020 I’m just planning to use what I have on hand. Thinking next stage will be to raise the grain, then alkanet oil to give it a bit of colour. Shellac to seal then a top coat of tru-oil to finish. I know a lot of folks don’t like try-oil, but it’ll do the job. I took a file carefully to the cracks and they’ll all but sand out I think. Quote Link to comment Share on other sites More sharing options...
oldypigeonpopper Posted May 8, 2020 Report Share Posted May 8, 2020 (edited) 42 minutes ago, Smokersmith said: I’m just planning to use what I have on hand. Thinking next stage will be to raise the grain, then alkanet oil to give it a bit of colour. Shellac to seal then a top coat of tru-oil to finish. I know a lot of folks don’t like try-oil, but it’ll do the job. I took a file carefully to the cracks and they’ll all but sand out I think. hello, ok sounds good, i would not worry about marks or filling as all part of the history, can you add photos ? Edited May 8, 2020 by oldypigeonpopper Quote Link to comment Share on other sites More sharing options...
Smokersmith Posted May 8, 2020 Author Report Share Posted May 8, 2020 Will do ... Quote Link to comment Share on other sites More sharing options...
Mr.C Posted May 8, 2020 Report Share Posted May 8, 2020 If you have fine wood dust rub it into the cracks 1st and pile a little on top, then add the zap/thin CA to that. Make sure your CA is fresh as if it's getting a bit gloopy you won't get much down into the split. Stuff we use at work, trade name Zap, is like water. Personally I'd use Danish oil to seal but use what you have. Quote Link to comment Share on other sites More sharing options...
Smokersmith Posted May 10, 2020 Author Report Share Posted May 10, 2020 OK ... cracks are sorted. I’ve sanded the overspray off the stock, and I’m down to the bare wood. In its naked state it looked ok, but after the alkenet oil it looks very patchy ... remnants of years of grime soaked into various parts of the wood.https://www.dropbox.com/sc/a34ijcauwyk7dwr/AAAOD-Vxj-bKtVig3M3TB4zDa I think I’ll sand it back a bit more then look to go with a walnut stain .... treating the light parts first with more coats to try to even up the colour ... any other ideas? Quote Link to comment Share on other sites More sharing options...
johnphilip Posted May 10, 2020 Report Share Posted May 10, 2020 Just be careful when sanding . Keep checking your butt plate for size . The grip area looks great now . Those cracks near the butt may fill with the super glue and saw dust your rubbing of and hopefully keep . The difference in colours are not to bad . When I do my wood turning I use a stuff called . Sanding sealer . It seals the wood , make it less porous let you have to use less coats to seal it . It's coming on well I think . Quote Link to comment Share on other sites More sharing options...
Smokersmith Posted May 10, 2020 Author Report Share Posted May 10, 2020 Thanks … gave the woodwork a rest today. On the metalwork … I've stripped the decades of overspray off, degreased the parts, and started to get back to metal. I've even uncovered the Edgar Bros Liverpool piece I never knew was there! I'm down to bright in some places, but still small black marks all over at the moment from historic rust .... not sure I can be bothered to go all the way to bright everywhere .. reckon it would cost me 20 quid in sandpaper!! After a bit of research I've decided to stick with the original leather piston seal, but treat it to a TbT spring kit … original spring so no problems with overpower hopefully. Next pics will be before and after blueing .. I'm not expecting miracles, but whatever I get will be a significant improvement. Quote Link to comment Share on other sites More sharing options...
johnphilip Posted May 10, 2020 Report Share Posted May 10, 2020 It's great to see things moving along , just remember it has age , and that should be part of its look . Look forward to seeing the results . Quote Link to comment Share on other sites More sharing options...
matone Posted May 10, 2020 Report Share Posted May 10, 2020 3 hours ago, Smokersmith said: Thanks … gave the woodwork a rest today. On the metalwork … I've stripped the decades of overspray off, degreased the parts, and started to get back to metal. I've even uncovered the Edgar Bros Liverpool piece I never knew was there! I'm down to bright in some places, but still small black marks all over at the moment from historic rust .... not sure I can be bothered to go all the way to bright everywhere .. reckon it would cost me 20 quid in sandpaper!! After a bit of research I've decided to stick with the original leather piston seal, but treat it to a TbT spring kit … original spring so no problems with overpower hopefully. Next pics will be before and after blueing .. I'm not expecting miracles, but whatever I get will be a significant improvement. Look forward to seeing how things come out!! Reading this made me get my 35 out today for 1st time in ages,they are a special gun ,very handy ,with a trigger that many CF rifles would do well to have!! Quote Link to comment Share on other sites More sharing options...
Smokersmith Posted May 13, 2020 Author Report Share Posted May 13, 2020 Pretty pleased with how the re-blacking turned out. Still retains some patina on the top from the pitting, but overall very happy. I used the Phillips product. https://www.dropbox.com/s/5ystgwz8t0073bl/Photo 13-05-2020%2C 07 39 43.jpg?dl=0 And a reminder of the start point! https://www.dropbox.com/sc/s1t0ikazdzn8xvf/AADlEZ5KHjVvkjaTWCZ5QqTwa Quote Link to comment Share on other sites More sharing options...
matone Posted May 13, 2020 Report Share Posted May 13, 2020 That looks very good ,was it straightforward to use and achieve that result? Quote Link to comment Share on other sites More sharing options...
Smokersmith Posted May 13, 2020 Author Report Share Posted May 13, 2020 I'd say yes overall … as I managed it! I did quite a lot of online research … key takeaways .. 1) Prep is key 2) Get organised … I had an area with a sink, dipping containers sized to allow immersion, sanding etc … all separated, and used plenty of disposable gloves 3) It said dilute 3:1 .. I used 2:1 … and used a brush to agitate the parts 4) I used a heat gun to help drying between stages, and warm the parts prior to the final treatment 5) Once dry and sprayed with oil … I left it overnight to 'set' 6) I could have got a better finish by taking the pits all the way back to bright … but decided to retain some character of the 40+ year old piece 7) I think I'll need to keep it oiled to maintain it I've used the Birchwood Casey product, but the Phillips stuff seems to give a better result. Quote Link to comment Share on other sites More sharing options...
johnphilip Posted May 13, 2020 Report Share Posted May 13, 2020 Wow it's looking very bonny , looking forward to seeing it all back together . And I bet you are aswell . You wont want to take it out to use it 😀😀😀😀 Quote Link to comment Share on other sites More sharing options...
Smokersmith Posted May 13, 2020 Author Report Share Posted May 13, 2020 It’s a battle!! On one hand I know taking my time will deliver better results, on the other hand I’m desperate to try it with it’s new guts and chrono it. What helps is the slower deliveries of components/materials that forces me to take a step by step approach. It’s certainly enjoyable 👍 Quote Link to comment Share on other sites More sharing options...
matone Posted May 13, 2020 Report Share Posted May 13, 2020 You`ll get a lot of satisfaction from the end result ,that`s certain! Quote Link to comment Share on other sites More sharing options...
7daysinaweek Posted May 13, 2020 Report Share Posted May 13, 2020 What a lovely job on the blueing or blacking I should say. I recall blueing a airgun back in the early eighties with what was probably a toxic substance, it stank and I could not get it off my hands for weeks. It is a million miles from what it was SS and keep us posted. Quote Link to comment Share on other sites More sharing options...
Smokersmith Posted May 15, 2020 Author Report Share Posted May 15, 2020 Ok ... the piston is now polished and looking much better. I’m aiming to keep the traditional leather seal, does it look in good enough condition to lubricate and re-use? https://www.dropbox.com/sc/1fyop3ogp0hmklr/AAC0RpTZe8VmZkw3xmpUnkTZa Quote Link to comment Share on other sites More sharing options...
Smokersmith Posted May 19, 2020 Author Report Share Posted May 19, 2020 Well ... I couldn’t resist so I reassembled it with the original spring to have a go! Power was a bit up and down to start with, but it settled to a decent 10.3. The TBT kit should be here by the end of the week, so at least I’ve a benchmark now. https://www.dropbox.com/s/nj4xi3mt9s1h24m/Photo 19-05-2020%2C 15 12 30.jpg?dl=0 Quote Link to comment Share on other sites More sharing options...
matone Posted May 19, 2020 Report Share Posted May 19, 2020 Looks good! Quote Link to comment Share on other sites More sharing options...

Recommended Posts
Join the conversation
You can post now and register later. If you have an account, sign in now to post with your account.
Note: Your post will require moderator approval before it will be visible.