


CaptainBeaky
-
Posts
1,236 -
Joined
-
Last visited
Content Type
Profiles
Forums
Calendar
PW Shop
Everything posted by CaptainBeaky
-
The problem with drilling and pegging/threading is that the lug is right on the edge of the block, so once the hole is drilled and tapped, there is barely half a mm of material there to support the thread on the outer face. I'm beginning to see why the American guy that Mark mentioned in the Pump Club thread drilled and tapped the action body and put a cap head screw into each side! For building up the lugs with TIG, ceriated electrodes will work as well as zirconated - a.c. would be better, but DCEP should work over the tiny weld pool required. Thin peg and soldering a block on might be feasible, the problem is getting enough heat in to the solder joint without melting the rest of the block. Or I could just drill through and put a roll pin in. Interesting times...
-
Yes, blister pack with the Bluemagic logo, so probably genuine, but as you say, but quite strong enough in shear for this application . Next thing to try, I think, will be building up the lugs with tig. Possibly with steel cores drilled in to add bending strength. Just need to get some ally rods and some practice first!
-
How to tell if it is genuine? A combination of the above three suggestions looks viable: drill the centre of the peg it to a reasonable size, turn a round end onto a square bar to match said holes, file the square/round transition to match the angle of the break on the trigger block (see first photo), then silver solder or braze in place. Tbh, tig might be a better option if I can a. find the right rods and b. find something suitable to practice on. Just has to be very low current...
-
Good thought...
-
Bent ejector body or worn claw? One easily fixed with a vice, the other with a vice and a file! This is a Baikal we are talking about!
-
Been shooting clays this morning, so guns to clean while drinking tea, then firewood to log and split this afternoon. DoomBar and decent whisky in stock for later
-
I have shot the Higgins... My, my, what fun 15/25 ESK, then 53/70 ESP, so well down to my usual standard, and a whole barrel of fun to shoot. Lots of positive comment from folks at Hawley as well. Had the odd ftf and one fte - down to operator error, as far as I can tell. The "ears" repair didn't fare so well, so I'll try the bridge idea next. If not that, then I'll get some new lugs welded on. Full choke is, errr, interesting! Not ideal for skeet, certainly, but when you connect with the clay, it vaporises! Might consider getting it opened up a bit. Noticed last night that the recoil pad is actually a JC Higgins branded one. Unfortunately, no 1 son also likes it - I need a big "MINE" label to attach to it!
-
I will maybe try making up a bridge with Dural - if that doesn't do it, I'll have to go down the welding route. Must be able to find someone who does ally welding!
-
Update after shooting it: After about 30 shots, the putty started to break up - it doesn't appear to be strong enough to support the protrusion required. Back to the drawing board!
-
And they are always trying...
-
I had considered that, but the metal is an unknown aluminium alloy, so I wasn't confident about welding into it (never fine ally welding before, either). As getting a replacement block is a near-impossibility, I thought this method was somewhat safer!
-
The Higgins trigger block has been repaired - it now has new ears 😁 Photos in my New Ears thread over on the DIY section Tomorrow, I shall go and shoot with it...
-
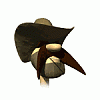
So, having stripped down the Higgins model 20 to see what horrors lay within, I discovered that the two little "ears" that locate the front of the trigger block had been broken off by a previous ham-fisted idiot, sorry, enthusiastic owner... This resulted in noticeable vertical movement of the trigger mechanism - disconcerting, if not actually dangerous. I had considered making up a spacer to lock the trigger block into the frame, but in a flush of inspiration it occurred to me to use metal repair putty... Cleaned the broken ends Drilled for supporting pegs Pegs fitted (1.6 mm welding rod) Putty applied Pegs shaped Polished down and reassembled No movement in the trigger mech, and the action is as slick as before
-
Complete and utter bovine excretion! Codeine is present as the analgesic, paracetamol is present as an anti-pyretic (fever-reducer) - it's not really a painkiller as such. It's difficult to o/d on codeine, and it probably won't kill you. If you o/d with co-codamol, liver failure from the paracetamol is what they will put on the death certificate, but that is NOT the reason for it's presence.
-
Double post!
-
Thanks, Roland - enjoy the show! If I don't get out to shoot this weekend, it will be my last chance until December, as I'm working every weekend until then 😨
-
Change of plan on replacing the "ears" on the Higgins' trigger block: If metal putty can mend the cylinder block on a car engine, it should be strong enough to fabricate some non-load-bearing locating lugs... A quick exercise of my Google-fu turned up some stuff called Quiksteel, which also comes in aluminium flavour, looks like being an adequate material (as per the engine block mentioned above). It arrives tomorrow, cast tomorrow evening, file to shape Friday evening, take it to Hawley on Saturday and shoot it! Photos will appear when I have done the deed 😁
-
You have every right to be proud
-
Thanks for that, Mark - that Imperial model does look nice, although perhaps it loses the somewhat agricultural charm of the standard models Fixing the broken lugs by drilling and tapping the receiver does, I fear, reveal a complete absence of style!
-
Aren't all model 12's take-down?
-
I think the meal of this tale is, "Don't DIY!"
-
Right handed shooters - load from left of right?
CaptainBeaky replied to Salop Matt's topic in General Shooting Matters
Hold gun in right hand, load with left. Cartridges in left pocket. -
Thanks all. Took it apart last night (having been reading up on it all week...) Too late on the locating lugs on the trigger group - some muppet has already broken them off :( Still, not a load bearing part, so I will groove the front corners of the trigger block and make up a separate locking lug in a sort of H shape. Action was quite sticky when I picked it up from Chateau Bosher, hence the strip down. Having removed all the rcap, including some oil that had made transition to varnish, and re-lubricated everything, it now does the "push the action release and it opens all the way under it's own weight" thing The batch number gives a delivery date to Sears of 11/6/1956, and it is a plain (no rib) barrel, full choke. I had planned on a quick visit to Hawley on the way home, but time and the M11 conspired against me - maybe next weekend. I'm certainly looking forward to shooting it 😀
-
I have succumbed...
-
Another vote for Justin - he's very good, tutorials are well paced and easy to follow. He has a set of "absolute beginner" tutorials on his site as well.