


CaptainBeaky
-
Posts
1,236 -
Joined
-
Last visited
Content Type
Profiles
Forums
Calendar
PW Shop
Everything posted by CaptainBeaky
-
How did you get the pattern on the blade? Etched? I thought it was a pattern wielded blade until I read the bit about it being a left-over sliver of O1. Very nice gesture, and a very cute little blade.
-
Oops! Forgot this bit Need to remove the stress raiser (sharp angle at the end of the crack) to stop the crack propagating any further. I suspect this wasn't done the first time, and as Daf says, using the wrong glue makes it a bit of a pig to get anything else to stick.
-
Epoxy and pin is the way to go. Something like Aerolite? Plus a couple of 3mm pins, toothed up and set below the surface, then fill the pin holes with more epoxy, mixed with the dust from drilling the pin holes.
-
Just a teaser .....................
CaptainBeaky replied to Walker570's topic in Craft and DIY Section
Nice job - looking forward to the finished article. -
Love it! (And so true... )
-
PM sent
-
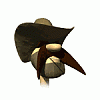
Could I have the top right one as I'm looking at it, please? I am seeing your tape measure at the top of the picture, so of the two forks closest to the tape, it's the one closest to the two antler rolls, if that makes sense?
-
Is that an integral, or grey scales? Looks very handsome - any pics of the spine to see your filework?
-
Signed. And replied to the consultation as well Just how it will do some good...
-
Nice work, that
-
Looking good, dm. (Not jealous at all, honest... )
-
^^ This... Sandwiching a layer of hard steel between two softer layers is called san-mai, and is quite a common technique - gives a very hard edge, supported by softer, tougher sides. Japanese swords achieve the same effect by differential hardening: the spine of the blade is coated with clay to make it retain the heat longer. The blade is quenched edge-first into water, which makes the edge extremely hard, but the heat retained in the spine allows the quench, resulting in a softer, tougher temper. The difference in the crystal structure of the steel across it's width is what makes the blade curve - they are originally forged straight! This also makes them prone to breakage in the quench... I have some photos of a tanto I made which show this quite well - LINK
-
What, in Kettering?
-
Great idea, Mick Do you have to be a Mason?
-
Result!
-
Try Algy's Autos.
-
That's interesting - you do things in the opposite order to me! I make a paper/card pattern to go around the knife, leaving my seam allowance, then transfer this into the leather and cut it. Make and glue the welt into the edge, then fold and glue the edges together (after making the loop!). Clean the welt edge on a drum sander, then cut the stitch groove, mark and punch the holes. Complete the stitching, using waxed thread (helps lock the twists together, and coincidentally makes it much easier to thread the needle!). Wrap the greased knife in cling film. Immerse the sheath in lukewarm water until slightly soft, then ease the knife in. Using a bone folder, smooth the leather over the knife, including making any snaps required. Allow to dry, removing the knife when amongst dry. Clean the knife, stain/polish the sheath. I always punch holes rather than drill - a punch moves the majority of the fibres it of the way, whereas a drill cuts them, weakening the leather.
-
Saddle stitch *is* a knotted stitch A quick look reveals: Tutorial by Ian Atkinson
-
That's pretty good for a first go Some suggestions: Get a stitching pony/clamp - this holds the work so you have both hands free, and (I find) makes out ready to keep the tension constant. Use an edge groover to set your stitch line - this cuts a groove parallel to the edge that the stitches lie in, hence protecting the thread. It also makes the stitch line tidier. Practise! Did you use saddle stitch, knotting at each stitch? It looks as if you may not have done your loop through in the same direction each time. How do you punch stitch holes? Make sure your awl is sharp and polished, and put a piece of thick scrap leather under the work piece when punching holes. Try to keep the spacing consistent. With a diamond awl, turn it so two opposite sides of the diamond are parallel with the stitch line - this makes the stitches lie flatter. I have recently started using a pricking iron for setting space and angle, and it makes things much tidier. I don't have any pictures to hand to illustrate, but a quick Google should turn up something suitable. The leatherworking.net forums are a good source of information. Good luck, and beware - it's just as addictive as knife-making...
-
I would suggest machine to over size, heat-treat, then grind/polish down to final size
-
If it's a Slugster, then it will be cylinder, surely?
-
As stated before: Use one of the well known brands, and alternate with another type with a different active ingredient. If you continue using just one, then eventually, you will build up a resistant population of fleas - and it won't take that long.
-
As said above - if it's for work, Stihl or Husqvarna. I have a 445 as a hobby/home user, and it's great in terms of cutting speed, weight and vibration. Might lack a bit of poke for really big stuff, but it runs an 18" bar just fine on softwood, and handles oak and beech with a 15".
-
Ruger No 1 Tropical Other
CaptainBeaky replied to Gun Watch's topic in Guns for Sale (Private Sales)
Do you mean one of these: Or one of these? -
There was a very long thread on this topic recently in the Guns and Equipment sub forum.